
There is a wealth of artistic techniques to master across the entire artistic spectrum. Mastering elements such as composition, light, and shadow is a crucial part of honing your skills as an artist - it’s just as important as learning how to depict the world around you.
To help you conquer everything you need to know, we will share some insights from the most exciting artists about the best professional techniques.
There are examples that will help you add more professional techniques to your creative arsenal - and in a variety of different styles.
Painting has always been one of the most expressive artistic mediums, allowing artists to experiment with different styles and techniques until they find their own unique artistic expression.
It all starts in prehistoric times, when they painted on cave walls. We can say that these early artists skillfully used tools and techniques to preserve their works of art to this day.
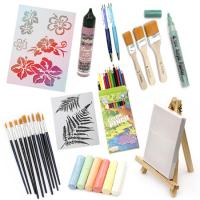
Pencils and paper are the starting materials for most people.
As you grow as an artist, you will soon find that you want to try different techniques and new materials. Despite many technological advancements, artists’ materials have changed little over the centuries. Nowadays, most materials are easier to use and have a wider range of pigments, but essentially the way we use them remains practically unchanged.
Fortunately, at EM ART, we provide you with drawing materials and everything you need for your art projects at relatively cheap prices. It is advisable to first avoid unnecessary expenses and frustration, buy moderately. Start with a material that you like and gradually move to others when you feel the need to expand your range and refresh your approach.
The "lead" pencil is familiar to everyone, but it is not and has never been made of lead, but of graphite, a type of carbon that is mixed with clay and baked. Graphite pencils are best sharpened with a sharp knife rather than a pencil sharpener.
They are classified from hard (H) to soft (B). 9H is the hardest, while 9B is the softest, with F (for fine) and HB in the middle range. H pencils (2H, 3H, and 4H; they gradually become harder) are good for clear, light lines, but will scratch the surface of your paper, so B pencils are better for softer, tonal work.
Each grade of pencil will produce only a tone of a given darkness, and no pressure will make that tone darker. If you need a darker tone, you will need to switch to a softer grade pencil.
Soft pencils will give a greater range of tones than hard pencils and can be erased without leaving an indentation if you make a mistake. For this reason, most drawings are done using a pencil that is HB or softer. Aim to use 2B or 3B to start your drawing and move to a softer - or blacker - pencil like 6B or 9B for deeper tones.
Most mechanical pencils, also known as clutch or drive pencils, are good for precise work.
Pastel pencils are made from a stick of hard pastel encased in a wooden barrel. Avoid dropping them as the soft pigment stick breaks easily. These pencils are harder than soft pastels and resemble colored pencils, although they have a more scratchy, brittle feel. They are good for detailed line work as well as shading, as they are not waxy and can blend well.
The mark made with a pastel pencil is not permanent and will need to be sprayed with a fixative. These pencils are very easy to work with. A wide variety of strong colors are available. They are ideal not only for finished drawings but also for quick sketches and are particularly effective when used on colored paper.
Colored pencils are made in the same way as graphite pencils. The pigment is mixed with a clay filler and a binder. Wax is added, which acts as a lubricant and helps the pencil glide smoothly over the paper.
Sticks and pencils are natural pigments bound with gum arabic. Sticks and hard chalks or pastels are ideal for making color sketches. The most popular colors are earth tones - white, black, gray, brown, and rust, like sanguine (reddish-brown) and sepia, but they also come in a wide range of other colors. They work especially well on colored paper and can be used with other dry drawing media.
While pencils are more suitable for line work, sticks can be used for blocking in larger areas of tone. They can be smudged and blended but are not easily erased.
These are essentially charred wood and are among the oldest drawing materials.
Made from carbonized wood (usually willow, but beech and vine can also be found), the sticks are graded as soft or hard and come in four thicknesses:
Thin sticks work well for fur, feathers, and other fine details, while block charcoal works well for large areas.
Paint is an amazing substance that allows us to do all sorts of things. Paint is used in various ways. From fences to landscaping, to reconstruction and more, painting has become synonymous with weekend projects.
But given all the information we know about how people use paint, it remains a magical substance that comes in many forms. There is paint that acts as a primer and paint in one. There is paint that helps reduce the buildup of dirt and dust on your projects. There is paint that has certain textures. And there are all sorts of colors.
It can be a bit overwhelming, but we can help you navigate the maze of painting options. We think it would be more fun to share some amazing facts about paint so you can appreciate it in a whole new light.
Glass can be a great canvas to use for painting. It provides a smooth surface to work on and can create some beautiful images, especially when illuminated by natural light shining through the glass.
If you want to paint on glass, it’s important to have the right materials, especially when it comes to paints. Although there are many paints that work well with glass, it’s important to first plan what type of glass you will paint on and where your painting will be displayed.
These paints are self-sealing paints, which means you don’t need to do any sealing or additional preparation after painting the glass to ensure the paint stays.
The paint is smooth and easy to work with and dries relatively quickly (within a few hours). The paints also have a highly pigmented finish, retaining their bold colors once dry, and are also quite scratch-resistant.
The paints also mix wonderfully, allowing you to create your own colors with ease.
Although it may not look like much when you first squeeze it out of the bottle, once dry, the colors really shine. Because it uses water-based enamel, they will need to be baked to prevent washing away.
Paint is very easy to use, but it may take some getting used to if you are accustomed to thicker oil-based paints. It can also be used on other surfaces but has a 21-day curing time.
If you are brand new to painting on glass, this is one of the best paints you can get. It is easy to work with and does not need to be baked, so there is less work to do to make the finished piece.
The durability of the paint is what makes them great for glass jars thanks to the scratch-resistant seal that forms after the paint dries. However, do not paint the part of the jar that will come into contact with food or liquid, and leave an unpainted rim around the mouth of the jar if you plan to use it for drinking.
The paint is smooth and easy to work with, and the colors blend well. The paint is also water-based and non-toxic, although, as with most paints, you should avoid painting surfaces that will come into contact with food or drink.
Decoupage, also spelled Découpage, (French: "cutting out"), the art of cutting and pasting cutouts to simulate painting on wooden, metal, or glass surfaces.
There are many variations in technique, but the four basic steps of decoupage are usually:
Projects are enhanced not only with paper and fabric but also with painting effects, gold leaf, ink, embellishments, and even other media.
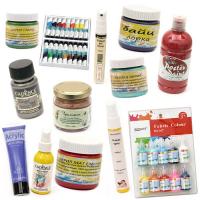
Textured pastes from EM ART are used to create relief, three-dimensional images when working with acrylic paints, decoupage, or decorating various hard surfaces such as:
Relief pastes have a thick and dense structure and rich colors. They are applied with a spatula or brush and can be used for painting as well as for shaping images with stencils. If necessary, they can be diluted with water and mixed with other water-based products.
Store at room temperature, avoiding freezing or heating. The drying time of textured pastes depends on the thickness of the applied layers.
Trust EM ART for all your hobby inventions and turn them into true works of art, capturing every detail!
We will use and combine various products for a truly stunning effect. We at EM ART are in a winter mood and decided to share with you how to make a beautiful box with a winter theme.
As always, the first step we start with is applying a layer of acrylic primer. This is the base that allows us to evenly and economically apply the products with which we will build the technique we are working on.
Apply with a soft brush in the direction of the wood grain - this way the product will absorb even better. The acrylic primer dries in about three hours. If you wish, after the layer dries, you can polish it with sandpaper - this way you achieve the smoothest surface possible, which allows for even better coverage of the products applied on top. We prime the entire box.
After the layer dries, we apply a layer of white acrylic paint to the lid of the box. This is the base for the decoupage that we will do a little later. Wait for it to dry. The next product we will use for our fairy-tale box is the long-awaited pastes.
Pastes are thick, water-based products with rich pigments. After drying, the surfaces have a delicate, slightly relief, and grainy effect. They are suitable for decorating any surfaces and do not need to be additionally varnished.
They can be processed with sandpaper, and are also excellent for working with stencils. They can be applied in any way - with a spatula, brush, sponge... With these wonderful products, we will decorate the base of our box.
We chose colors of truffle, champagne, blue lagoon, and emerald green. Mix and blend the colors boldly! You will see how easily the pastes are applied to the primed and sanded surface. In some places, we added a little paste in anthracite color - this way we enhanced the depth of the achieved shades.
We also applied it with a brush to the box fittings - hinges and clasp. After drying - about three hours - the fine, grainy effect stands out clearly. If you want to tone down the intensity of the colors, you can lightly polish with sandpaper.
The next step of our work is to make decoupage on the lid. We chose a napkin with a fairy-tale winter motif. Apply a layer of decoupage glue and varnish to the lid and carefully stick the napkin on top. Smooth out wrinkles and air bubbles, if any, with another layer of glue.
We will decorate the base of the box with delicate, relief images of snowflakes made with a stencil. When working with stencils, it is advisable to fix the chosen detail with stencil spray adhesive.
The adhesive prevents the material you apply through the stencil from smudging, and the adhesive does not leave a trace on the decorated surface. We made decorations with beautiful relief snowflakes with pearl-colored paste - we worked both on the base of the box and around the image on the lid.
Here we should note that pastes are excellent for working with stencils with very fine details. For an even more artistic effect on our fairy-tale box, we added another extremely interesting product - glitter gel.
The color we chose is silver - after drying, the gel is semi-transparent, and in daylight, the glitter particles are barely noticeable. In a dark room, the details made with this product stand out very visibly and clearly in the darkness!
We added additional texture to the polar animals by using velvet powder. For this, we applied a thin layer of decoupage glue to the image and generously sprinkled white velvet powder.
We pressed lightly with our fingers and cleaned off the excess. The powder adheres to the slightly sticky surface and creates a beautiful, slightly relief velvet effect. This highlighted the fluffy effect of the beautiful animals.
Finally, use a spatula and truffle-colored paste to shape a frame around the edges of the lid. And our beautiful, winter, fairy-tale box is now ready to house a magical gift for a loved one. And when you leave it in the dark, it will glow with a gentle and delicate light.